In this Article we will show you how to unlock...
Read More

Written by Digital Media Zone
Creating Your Facebook Group, Step by Step
Introduction
The good news is that creating your Facebook Group is a simple and straightforward process.
· From your homepage/feed on Facebook go to the Explore – Groups section on the left side menu and click on ‘Groups’.
Click ‘Create Group’ as shown in the screenshot below:
· Enter the name of the group and add at least 1 friend to the group. If you don’t add at least one friend, you will get an error.

Create a New Group
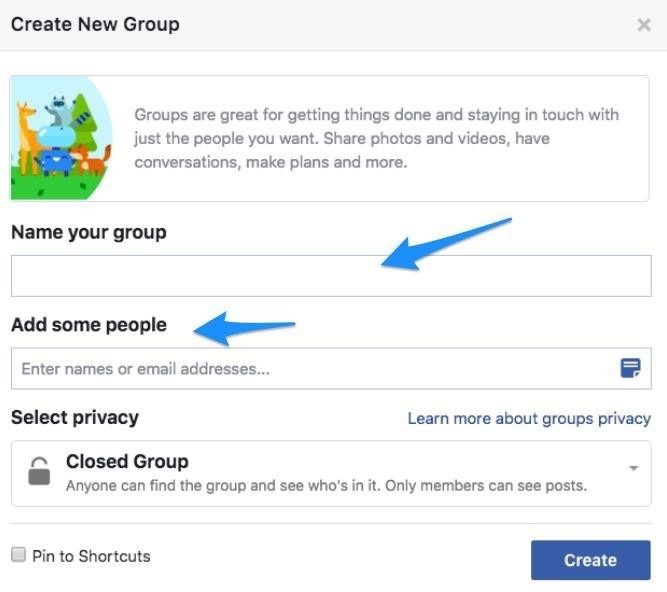
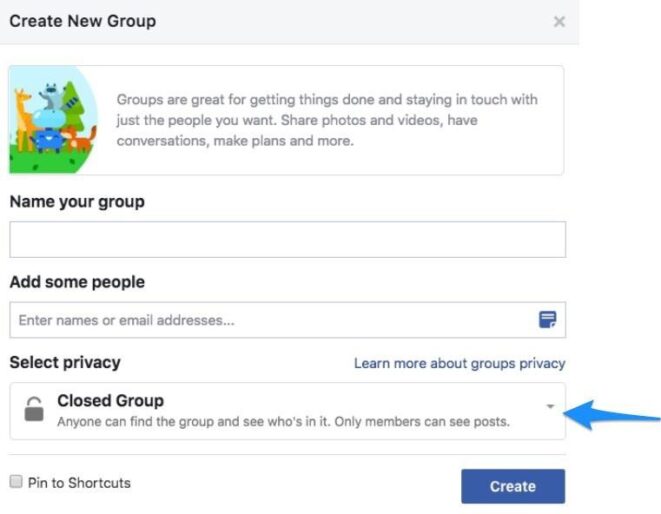
Set your privacy settings.
Add Your Heading Text Here
o Public – Anyone can discover your group and can see what you have posted.
o Closed – Anyone can see the group and who created it. But only members will be able to see the content that gets posted.
o Secret – Only members will be able to discover the group at all.
This is a fairly simple and straightforward process, and from there you will be able to begin posting content to your group and inviting new members.
However, there are a number of different aspects to consider when making these seemingly basic choices.
For one, when picking the profile picture, you need to ensure you choose one that will reflect your brand in the way you want to be seen.
This will help your Facebook page to stand out. In many cases, this will be the first thing that a new member sees, and therefore it will be your first impression. It’s your job to ensure that impression is both positive and accurate.
Remember what we discussed in chapter 1:
it is better to have a small but highly engaged list of members, than it is to have a huge list of people who don’t read any of your posts or interact with the community.
With this in mind, the best way to choose your photo is to think carefully about the type of person you want to attract, which in turn should be the type of person that is most likely to be interested in what you have to say and to buy any products or services you sell in future.
Knowing your Brand:
In other words, you need to know your brand well enough and to know your “buyer persona”. A buyer persona is a fictional biography of your ideal customer – the perfect demographic with the right mix of interests. Knowing who this person is, will allow you to better communicate to that
audience. And to do that, you need to know what your BUSINESS is all about, and your mission statement.

What are your Products and Services
What kind of company are you? What makes you stand out from the competition? What is it people like about your products or services? What kind of person is it who enjoys what you do? And how can you say all of that with your single image?
Keep in mind as well that the image is small and so can’t be too detailed. Aim to get an impression across, rather than fine details. Think about this with regards to your group name as well.
All these factors will also impact heavily on the choice of name for your group, and also the choice of topic.
Your Privacy
As for your privacy settings, this will depend very much on the type of group you are trying to create and what you hope to accomplish with it.
If your group is intended to act as a kind of “insiders’ club” for your very most loyal and engaged followers/customers, then setting the group to private could be the best strategy. This is especially true if you talk about the group on other platforms (through a blog for instance).
This way, someone interested in what they’re missing out on will HAVE to join the group in order to find out.
Remember what we discussed in chapter 1:
Your Groups Visibility
This can also be a very effective way of getting people to like and follow your Facebook page. If you make your group private, then the only way someone can join your group is through invitation – and that means they need to be active on your Facebook page first.
Then again, if you have fewer resources and your aim is to invest your marketing efforts into one place – such as the Facebook group – then you will want it to be seen by as many people as possible.
Therefore you’ll benefit more from a public group. In other words, if you ONLY have a Facebook group because you don’t have time to manage lots of different accounts, make sure it’s as easy to discover as possible.

Creating your Facbook Group – Name
As for the name, this is also of course an extremely important decision and one that will heavily impact on the direction, success, and even topic of your group. The mistake here, is to create a Facebook group that has a very broad subject, as denoted by the name.
Let’s say that you want to create a Facebook about dog lovers. Should you create a Facebook group called ‘Dog Lovers’ or should you create one called ‘Poodle Lovers’? The answer should be the latter.
Keeping Niche Specific
The reason for this, is that by having a much more precise and specific niche for your group, you will be able to cater precisely to that audience. There are hundreds of groups about dog lovers, but only a few for poodle lovers.
At the same time, the members of your poodle lovers group are likely to be much more engaged than the members of a dog lovers group.
That’s because they know they have more in common with the other members of the group, and it’s because they know they can share more specific stories.

Of course, honing your target audience in like this will shrink the potential size of the audience. But this matters less when the aim of the group is to create as highly engaged a list of members as possible.
All this once again comes from knowing your brand extremely well and understanding what it is that appeals to people about your business, and precisely who it is that is likely to buy from you.
More On Setting Up your Facebook Group
After this point, you’re still not done setting up. Some other jobs you need to complete include adding a description to your group, choosing a cover photo, and writing a welcome post.
Your description of course needs to encapsulate what your group is all about. Imagine someone is seeing the page for the first time having just been invited. What could you say to them that would both explain what your group aims to accomplish, while at the same time getting them to want to stay?
Once again, you need to ensure that you know precisely what it is that your business offers and what makes it stand out, so that you can better communicate that through your group description and so that you can get people to sign up as a result.

So far we have discussed how to setup the basics of your Facebook Group.
You have still only really scratched the surface of what a Facebook group can do and what it can be. There is a lot more setting up and creation to be done.
In the upcoming third post, we will dive into Chapter 4: “Advanced Features, Tools, and Settings,” where you’ll learn the essential techniques for building a successful Facebook Group.
Don’t miss out on this valuable information – subscribe now to ensure you don’t miss the continuation of our guide and receive updates directly in your inbox.
Thank you once again for your support, and we hope to connect with you soon!
This article delves into the potential of LinkedIn marketing, exploring...
Read MoreWhen you're strategizing where to invest your advertising dollars for...
Read MoreBy entering your email, you agree to receive our emails, including marketing emails, in line with our Privacy Policy.

